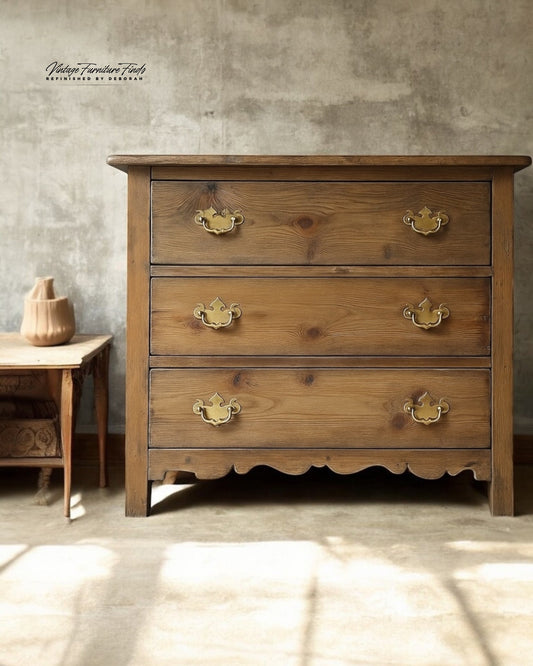
Discover how I turned a tired thrift store dresser into a raw, vintage-inspired beauty using Fusion Mineral Paint, SealCoat, and my go-to stripping method.

⸻
🛠️ The Before: A Solid Find with Hidden Charm
When I spotted this 10-drawer solid pine dresser at my local thrift store, I couldn’t pass it up. It had great bones, a classic shape, and endless potential—buried under chipping olive paint and mismatched hardware.
⸻
🧽 Step One: Clean & Strip the Finish
I started by giving the entire piece a thorough cleaning. Then I stripped the body using Greenez Strip n Clean Stripping Gel—my go-to for low odor and high performance.
• Apply generously
• Let sit for 30–40 minutes
• Scrape off using a putty knife or carbide scraper
• Optional: Follow up with Greenez Finishing Cleaner for a deeper clean
For the drawers, I used lacquer thinner, which helped soften the finish so I could remove it easily with a carbide scraper.
➤ Use code VINTAGEFINDS10 at Greenez for savings + free shipping on orders over $25

⸻
🪵 Step Two: Sand Smooth
Once everything was stripped, I sanded the entire dresser:
• 80 grit to remove any remaining residue
• Graduated up to 220 grit for a silky, even surface
This set the perfect stage for the next steps.

⸻
🧴 Step Three: Apply SealCoat
Before doing the paint wash, I sealed the wood using SealCoat to help even out absorption and prevent blotching—especially important for pine.
SealCoat creates a smooth barrier that allows a paint wash to glide on beautifully while keeping the wood grain front and center.
→ Click here for my full step-by-step on how to apply SealCoat before a paint wash.

⸻
🎨 Step Four: A Paint Wash with Fusion Alchemy
Now for the color! I used Fusion Mineral Paint’s Alchemy line in the shade Clay—a warm, muted tone that adds depth without hiding the grain.
I mixed the paint at a 3:1 ratio (water to paint) and only needed half of a 120ml jar for the entire dresser.
• Let dry overnight
• Lightly scuff sanded the next day for a smooth finish
➤ Use code vintagefurniturefindsfmp for 10% off at Fusion Mineral Paint

⸻
🌿 Step Five: Seal with SFO + Polyvine
To bring out that raw wood warmth and add protection, I sealed the dresser with Fusion’s Stain & Finishing Oil (SFO) in Natural.
It’s durable enough on its own, but I went one step further:
• Applied 2 coats of Polyvine Wax Finish Varnish in Satin for a soft, protective topcoat


⸻
🪚 Step Six: Custom Skirt + Knobs
The original skirt was simple, but I saw its potential. I:
• Removed and sanded the original trim
• Traced a new wavy scallop pattern directly onto it
• Made relief cuts to ease the curves
• Used a scroll blade jigsaw to follow the lines smoothly
Reusing the original trim kept the charm—and gave the dresser a custom, vintage look without replacing anything.
To finish it all off:
• I added new unfinished wood knobs, stained to match
• Lined the drawers for a clean, polished interior


⸻
🧰 Supplies I Used
Item Link
Greenez Strip n Clean Gel Shop here
Fusion Mineral Paint “Clay” Fusion site – 10% off code: vintagefurniturefindsfmp
Fusion SFO in Natural Same as above
Polyvine Wax Finish Varnish – Satin Shop here
SealCoat Steps + product guide
Carbide Scraper In my refinishing kit
Lacquer Thinner Spray Local hardware store
New Unfinished Wood Knobs Amazon/local source
Drawer Liner Optional but worth it!
⸻
🌟 Final Look: Warm, Raw, and Timeless
This dresser went from dark and dated to light and timeless using just a few products, patience, and a scroll blade. The Clay tone from Fusion’s Alchemy line layered with SFO in Natural brought out that raw wood beauty I love—perfectly vintage without being fussy.
Whether you’re flipping or keeping, this project shows how much character you can uncover under layers of old paint.


