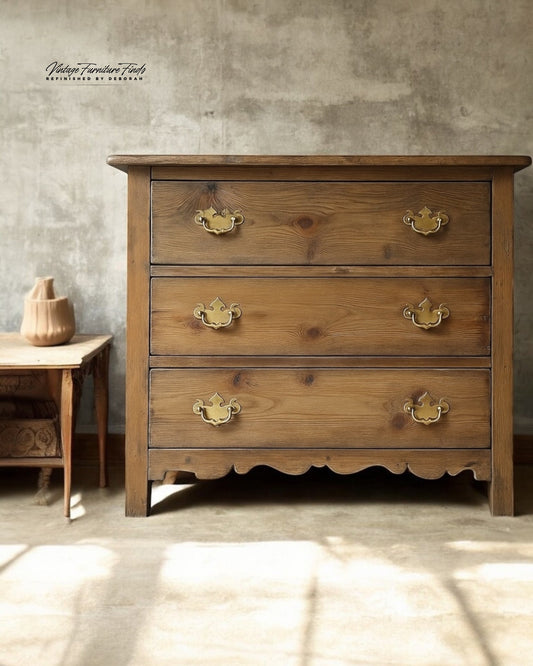
There’s nothing like watching raw wood come back to life under a hand-mixed amber shellac finish. This American Modern 3-drawer chest had great bones — clean lines, solid craftsmanship — but its original finish had seen better days. After a full sanding and a few patient layers of shellac, glaze, and wax, it’s now glowing again with that soft antique warmth you can only get from real shellac.

⸻

Step 1 — Strip & Sand
I completely sanded the old finish off, starting with 80-grit to cut through the lacquer and grime, then finished at 180-grit for a smooth surface that still allowed the finish to grip.
Tip: Don’t sand too fine before shellac — stopping around 180 leaves just enough tooth for the first coat to bite into the wood.

⸻
Step 2 — Mixing & Applying Amber Shellac
Instead of a store-bought mix, I used amber shellac flakes (like these) and denatured alcohol to make my own. The fresh mix dries fast, smells clean, and produces a clarity you just can’t get from premixed cans.
🧪 My Mix:
• First coat (seal coat): 1 oz flakes per 1 cup alcohol = a 1-lb cut
• Build coats: 2 oz flakes per 1 cup alcohol = a 2-lb cut
I dissolved the flakes in a glass jar overnight, stirring occasionally until smooth, then strained the liquid through cheesecloth before use.
⸻
Application Steps
•Seal coat (1-lb cut) — Brushed on evenly, let dry for 45 minutes, then buffed lightly with 0000 steel wool.
•Three build coats (2-lb cut) — Applied each coat about an hour apart, sanding lightly between layers.
•Final cure — Let the last coat dry overnight (6–8 hours minimum) before glazing.
Each pass deepened the color, revealing the honey-amber glow and natural depth of the wood grain.

⸻

Step 3 — Add Depth with Glaze
Once the shellac fully cured, I used Paint Couture Glaze in Raven Black to bring out shadow and contrast. I brushed it on, worked it into corners and details, then wiped it back gently with a damp cloth until it felt perfectly aged — not painted.
Dry time: Allow at least 12–24 hours before sealing or waxing.

⸻

Step 4 — Finish with Dark Walnut Wax
For the final layer, I sealed and aged the piece with Wise Owl Dark Walnut Furniture Wax.
Using a soft cloth, I massaged on a thin coat, let it haze for 10–15 minutes, and buffed to a soft luster.
A second light coat deepened the tone even more, giving the drawers that silky hand-rubbed feel and subtle antique patina.

⸻

The Result
The combination of hand-mixed amber shellac, raven glaze, and dark walnut wax created the perfect balance — warm, dimensional, and authentically aged. The finish glows from within, the grain is alive again, and the soft sheen feels like it’s been there for decades.
It’s not just a refinish — it’s a restoration of character.

⸻
Supplies Used
• Denatured alcohol
• 80-grit and 180-grit sandpaper
• Natural-bristle brush
• 0000 steel wool
• Paint Couture Glaze – Raven Black
• Wise Owl Dark Walnut Furniture Wax
⸻
Final Thoughts
Each layer — shellac, glaze, wax — built upon the last, creating a finish that’s both luminous and grounded in history. If you’ve never tried mixing your own shellac, this project proves it’s worth the effort. It dries fast, sands beautifully, and the results feel alive in a way no modern topcoat can match.


